huibin
- 浏览: 739176 次
- 性别:

- 来自: 郑州
-

文章分类
- 全部博客 (396)
- JAVA (50)
- ORACLE (22)
- HIBERNATE (1)
- SPRING (26)
- STRUTS (4)
- OTHERS (0)
- MYSQL (11)
- Struts2 (16)
- JS (33)
- Tomcat (6)
- DWR (1)
- JQuery (26)
- JBoss (0)
- SQL SERVER (0)
- XML (10)
- 生活 (3)
- JSP (11)
- CSS (5)
- word (1)
- MyEclipse (7)
- JSTL (1)
- JEECMS (2)
- Freemarker (8)
- 页面特效 (1)
- EXT (2)
- Web前端 js库 (2)
- JSON http://www.json.org (3)
- 代码收集 (1)
- 电脑常识 (6)
- MD5加密 (0)
- Axis (0)
- Grails (1)
- 浏览器 (1)
- js调试工具 (1)
- WEB前端 (5)
- JDBC (2)
- PowerDesigner (1)
- OperaMasks (1)
- CMS (1)
- Java开源大全 (2)
- 分页 (28)
- Eclipse插件 (1)
- Proxool (1)
- Jad (1)
- Java反编译 (2)
- 报表 (6)
- JSON (14)
- FCKeditor (9)
- SVN (1)
- ACCESS (1)
- 正则表达式 (3)
- 数据库 (1)
- Flex (3)
- pinyin4j (2)
- IBATIS (3)
- probe (1)
- JSP & Servlet (1)
- 飞信 (0)
- AjaxSwing (0)
- AjaxSwing (0)
- Grid相关 (1)
- HTML (5)
- Guice (4)
- Warp framework (1)
- warp-persist (1)
- 服务器推送 (3)
- eclipse (1)
- JForum (5)
- 工具 (1)
- Python (1)
- Ruby (1)
- SVG (3)
- Joda-Time日期时间工具 (1)
- JDK (3)
- Pushlet (2)
- JSP & Servlet & FTP (1)
- FTP (6)
- 时间与效率 (4)
- 二维码 (1)
- 条码/二维码 (1)
最新评论
-
ctrlc:
你这是从web服务器上传到FTP服务器上的吧,能从用户电脑上上 ...
jsp 往 FTP 上传文件问题 -
annybz:
说的好抽象 为什么代码都有两遍。这个感觉没有第一篇 和第二篇 ...
Spring源代码解析(三):Spring JDBC -
annybz:
...
Spring源代码解析(一):IOC容器 -
jie_20:
你确定你有这样配置做过测试? 请不要转载一些自己没有测试的文档 ...
Spring2.0集成iReport报表技术概述 -
asd51731:
大哥,limit传-1时出错啊,怎么修改啊?
mysql limit 使用方法
Servlet3规范提出异步请求,绝对是一巨大历史进步。之前各自应用服务器厂商纷纷推出自己的异步请求实现(或者称comet,或者服务器推送支持,或者长连接),诸如Tomcat6中的NIO连接协议支持,Jetty的continuations编程架构,SUN、IBM、BEA等自不用说,商业版的服务器对Comet的支持,自然走在开源应用服务器前面,各自为王,没有一个统一的编程模型,怎一个乱字了得。相关的comet框架也不少,诸如pushlet、DWR、cometd;最近很热HTML5也不甘寂寞,推出WebSocket,只是离现实较远。
总体来说,在JAVA世界,很乱!缺乏规范,没有统一的编程模型,会严重依赖特定服务器,或特定容器。
好在Servlet3具有了异步请求规范,各个应用服务器厂商只需要自行实现即可,这样编写符合规范的异步Servlet代码,不用担心移植了。
现在编写支持comet风格servlet,很简单:
- 在注解处标记上 asyncSupported = true;
- final AsyncContext ac = request.startAsync();
这里设定简单应用环境:一个非常受欢迎博客系统,多人订阅,终端用户仅仅需要访问订阅页面,当后台有新的博客文章提交时,服务器会马上主动推送到客户端,新的内容自动显示在用户的屏幕上。整个过程中,用户仅仅需要打开一次页面(即订阅一次),后台当有新的内容时会主动展示用户浏览器上,不需要刷新什么。下面的示范使用到了iFrame,有关Comet Stream,会在以后展开。有关理论不会在本篇深入讨论,也会在以后讨论。
这个系统需要一个博文内容功能:

新的博文后台处理部分代码:
 protected void doPost(HttpServletRequest request,
   HttpServletResponse response) throws ServletException, IOException {
  MicBlog blog = new MicBlog();

  blog.setAuthor("发布者");
  blog.setId(System.currentTimeMillis());
  blog.setContent(iso2UTF8(request.getParameter("content")));
  blog.setPubDate(new Date());

  // 放到博文队列里面去
  NewBlogListener.BLOG_QUEUE.add(blog);

  request.setAttribute("message", "博文发布成功!");

  request.getRequestDispatcher("/WEB-INF/pages/write.jsp").forward(
    request, response);
 }

 private static String iso2UTF8(String str){
  try {
   return new String(str.getBytes("ISO-8859-1"), "UTF-8");
  } catch (UnsupportedEncodingException e) {
   e.printStackTrace();
  }
  return null;
 }
当用户需要订阅博客更新时的界面:
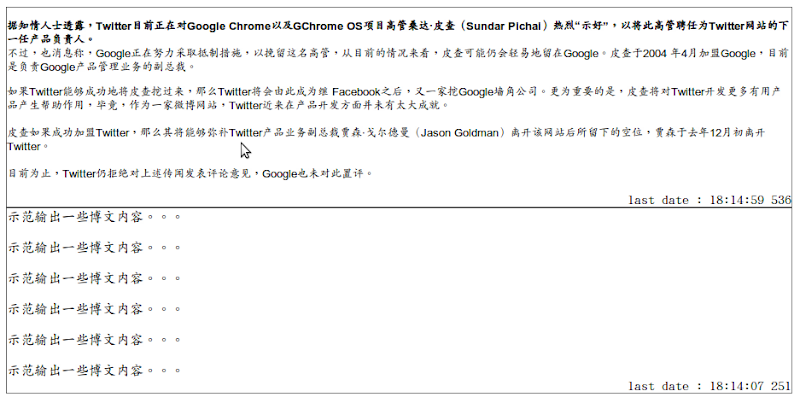
当前页面HTML代码可以说明客户端的一些情况:
<html>
<head>
<title>comet推送测试</title>
    <meta http-equiv="X-UA-Compatible" content="IE=8" />
    <meta http-equiv="content-type" content="text/html;charset=UTF-8"/>
<meta name="author" content="yongboy@gmail.com"/>
<meta name="keywords" content="servlet3, comet, ajax"/>
<meta name="description" content=""/>
<link type="text/css" rel="stylesheet" href="css/main.css"/>
<script type="text/javascript" src="js/jquery-1.4.min.js"></script>
<script type="text/javascript" src="js/comet.js"></script>
</head>
<body style="margin: 0; overflow: hidden">
<div id="showDiv" class="inputStyle"></div>
</body>
</html>
id为“showDiv”的div这里作为一个容器,用于组织显示最新的信息。
而客户端逻辑,则在comet.js文件中具体展示了如何和服务器交互的一些细节:
/** * 客户端Comet JS 渲染部分 * @author yongboy@gmail.com * @date 2010-10-18 * @version 1.0 */ String.prototype.template=function(){ var args=arguments; return this.replace(/\{(\d+)\}/g, function(m, i){ return args[i]; }); } var html = '<div class="logDiv">' + '<div class="contentDiv">{0}</div>' + '<div class="tipDiv">last date : {1}</div>' + '<div class="clear"> </div>' + '</div>'; function showContent(json) { $("#showDiv").prepend(html.template(json.content, json.date)); } var server = 'blogpush'; var comet = { connection : false, iframediv : false, initialize: function() { if (navigator.appVersion.indexOf("MSIE") != -1) { comet.connection = new ActiveXObject("htmlfile"); comet.connection.open(); comet.connection.write("<html>"); comet.connection.write("<script>document.domain = '"+document.domain+"'"); comet.connection.write("</html>"); comet.connection.close(); comet.iframediv = comet.connection.createElement("div"); comet.connection.appendChild(comet.iframediv); comet.connection.parentWindow.comet = comet; comet.iframediv.innerHTML = "<iframe id='comet_iframe' src='"+server+"'></iframe>"; }else if (navigator.appVersion.indexOf("KHTML") != -1 || navigator.userAgent.indexOf('Opera') >= 0) { comet.connection = document.createElement('iframe'); comet.connection.setAttribute('id', 'comet_iframe'); comet.connection.setAttribute('src', server); with (comet.connection.style) { position = "absolute"; left = top = "-100px"; height = width = "1px"; visibility = "hidden"; } document.body.appendChild(comet.connection); }else { comet.connection = document.createElement('iframe'); comet.connection.setAttribute('id', 'comet_iframe'); with (comet.connection.style) { left = top = "-100px"; height = width = "1px"; visibility = "hidden"; display = 'none'; } comet.iframediv = document.createElement('iframe'); comet.iframediv.setAttribute('onLoad', 'comet.frameDisconnected()'); comet.iframediv.setAttribute('src', server); comet.connection.appendChild(comet.iframediv); document.body.appendChild(comet.connection); } }, frameDisconnected: function() { comet.connection = false; $('#comet_iframe').remove(); //setTimeout("chat.showConnect();",100); }, showMsg:function(data){ showContent(data); }, timeout:function(){ var url = server + "?time=" + new Date().getTime(); if (navigator.appVersion.indexOf("MSIE") != -1) { comet.iframediv.childNodes[0].src = url; } else if (navigator.appVersion.indexOf("KHTML") != -1 || navigator.userAgent.indexOf('Opera') >= 0) { document.getElementById("comet_iframe").src = url; } else { comet.connection.removeChild(comet.iframediv); document.body.removeChild(comet.connection); comet.iframediv.setAttribute('src', url); comet.connection.appendChild(comet.iframediv); document.body.appendChild(comet.connection); } }, onUnload: function() { if (comet.connection) { comet.connection = false; } } } if (window.addEventListener) { window.addEventListener("load", comet.initialize, false); window.addEventListener("unload", comet.onUnload, false); } else if (window.attachEvent) { window.attachEvent("onload", comet.initialize); window.attachEvent("onunload", comet.onUnload); }
需要注意的是comet这个对象在初始化(initialize)和超时(timeout)时的处理方法,能够在IE以及火狐下面表现的完美,不会出现正在加载中标志。当然超时方法(timeout),是在服务器端通知客户端调用。在Chrome和Opera下面一直有进度条显示,暂时没有找到好的解决办法。
后台处理客户端请求请求代码:
/**
 * 负责客户端的推送
 * @author yongboy
 * @date 2011-1-13
 * @version 1.0
 */
@WebServlet(urlPatterns = { "/blogpush" }, asyncSupported = true)
public class BlogPushAction extends HttpServlet {
 private static final long serialVersionUID = 8546832356595L;
 private static final Log log = LogFactory.getLog(BlogPushAction.class);

 protected void doGet(HttpServletRequest request,
   HttpServletResponse response) throws ServletException, IOException {

  response.setHeader("Cache-Control", "private");
  response.setHeader("Pragma", "no-cache");
  response.setContentType("text/html;charset=UTF-8");
  response.setCharacterEncoding("UTF-8");
  final PrintWriter writer = response.getWriter();

  // 创建Comet Iframe
  writer.println("<!doctype html public \"-//w3c//dtd html 4.0 transitional//en\">");
  writer.println("<script type=\"text/javascript\">var comet = window.parent.comet;</script>");
  writer.flush();

  final AsyncContext ac = request.startAsync();
  ac.setTimeout(10 * 60 * 1000);// 10分钟时间;tomcat7下默认为10000毫秒

  ac.addListener(new AsyncListener() {
   public void onComplete(AsyncEvent event) throws IOException {
    log.info("the event : " + event.toString()
      + " is complete now !");
    NewBlogListener.ASYNC_AJAX_QUEUE.remove(ac);
   }

   public void onTimeout(AsyncEvent event) throws IOException {
    log.info("the event : " + event.toString()
      + " is timeout now !");

    // 尝试向客户端发送超时方法调用,客户端会再次请求/blogpush,周而复始
    log.info("try to notify the client the connection is timeout now ...");
    String alertStr = "<script type=\"text/javascript\">comet.timeout();</script>";
    writer.println(alertStr);
    writer.flush();
    writer.close();

    NewBlogListener.ASYNC_AJAX_QUEUE.remove(ac);
   }

   public void onError(AsyncEvent event) throws IOException {
    log.info("the event : " + event.toString() + " is error now !");
    NewBlogListener.ASYNC_AJAX_QUEUE.remove(ac);
   }

   public void onStartAsync(AsyncEvent event) throws IOException {
    log.info("the event : " + event.toString()
      + " is Start Async now !");
   }
  });

  NewBlogListener.ASYNC_AJAX_QUEUE.add(ac);
 }
}
每一个请求都需要request.startAsync(request,response)启动异步处理,得到AsyncContext对象,设置超时处理时间(这里设置10分钟时间),注册一个异步监听器。
异步监听器可以在异步请求于启动、完成、超时、错误发生时得到通知,属于事件传递机制,从而更好对资源处理等。
在长连接超时(onTimeout)事件中,服务器会主动通知客户端再次进行请求注册。
若中间客户端非正常关闭,在超时后,服务器端推送数量就减少了无效的连接。在真正应用中,需要寻觅一个较为理想的值,以保证服务器的有效连接数,又不至于浪费多余的连接。
每一个异步请求会被存放在一个高效并发队列中,在一个线程中统一处理,具体逻辑代码:
/**
 * 监听器单独线程推送到客户端
 * @author yongboy
 * @date 2011-1-13
 * @version 1.0
 */
@WebListener
public class NewBlogListener implements ServletContextListener {
 private static final Log log = LogFactory.getLog(NewBlogListener.class);
 public static final BlockingQueue<MicBlog> BLOG_QUEUE = new LinkedBlockingDeque<MicBlog>();
 public static final Queue<AsyncContext> ASYNC_AJAX_QUEUE = new ConcurrentLinkedQueue<AsyncContext>();
 private static final String TARGET_STRING = "<script type=\"text/javascript\">comet.showMsg(%s);</script>";

 private String getFormatContent(MicBlog blog) {
  return String.format(TARGET_STRING, buildJsonString(blog));
 }

 public void contextDestroyed(ServletContextEvent arg0) {
  log.info("context is destroyed!");
 }

 public void contextInitialized(ServletContextEvent servletContextEvent) {
  log.info("context is initialized!");
  // 启动一个线程处理线程队列
  new Thread(runnable).start();
 }

 private Runnable runnable = new Runnable() {
  public void run() {
   boolean isDone = true;

   while (isDone) {
    if (!BLOG_QUEUE.isEmpty()) {
     try {
      log.info("ASYNC_AJAX_QUEUE size : "
        + ASYNC_AJAX_QUEUE.size());
      MicBlog blog = BLOG_QUEUE.take();

      if (ASYNC_AJAX_QUEUE.isEmpty()) {
       continue;
      }

      String targetJSON = getFormatContent(blog);

      for (AsyncContext context : ASYNC_AJAX_QUEUE) {
       if (context == null) {
        log.info("the current ASYNC_AJAX_QUEUE is null now !");
        continue;
       }
       log.info(context.toString());
       PrintWriter out = context.getResponse().getWriter();

       if (out == null) {
        log.info("the current ASYNC_AJAX_QUEUE's PrintWriter is null !");
        continue;
       }

       out.println(targetJSON);
       out.flush();
      }
     } catch (Exception e) {
      e.printStackTrace();
      isDone = false;
     }
    }
   }
  }
 };

 private static String buildJsonString(MicBlog blog) {
  Map<String, Object> info = new HashMap<String, Object>();
  info.put("content", blog.getContent());
  info.put("date",
    DateFormatUtils.format(blog.getPubDate(), "HH:mm:ss SSS"));

  JSONObject jsonObject = JSONObject.fromObject(info);

  return jsonObject.toString();
 }
}
异步请求上下文AsyncContext获取输出对象(response),向客户端传递JSON格式化序列对象,具体怎么解析、显示,由客户端(见comet.js)决定。
鉴于Servlet为单实例多线程,最佳实践建议是不要在servlet中启动单独的线程,本文放在ServletContextListener监听器中,以便在WEB站点启动时中,创建一个独立线程,在有新的博文内容时,遍历推送所有已注册客户端
整个流程梳理一下:
- 客户端请求 blog.html
- blog.html的comet.js开始注册启动事件
- JS产生一个iframe,在iframe中请求/blogpush,注册异步连接,设定超时为10分钟,注册异步监听器
- 服务器接收到请求,添加异步连接到队列中
- 客户端处于等待状态(长连接一直建立),等待被调用
- 后台发布新的博客文章
- 博客文章被放入到队列中
- 一直在守候的独立线程处理博客文章队列;把博客文章格式化成JSON对象,一一轮询推送到客户端
- 客户端JS方法被调用,进行JSON对象解析,组装HTML代码,显示在当前页面上
- 超时发生时,/blogpush通知客户端已经超时,调用超时(timeout)方法;同时从异步连接队列中删除
- 客户端接到通知,对iframe进行操作,再次进行连接请求,重复步骤2
大致流程图,如下:

其连接模型,偷懒,借用IBM上一张图片说明:

分享到:


发表评论

相关推荐
Servlet3.0 异步处理 页面推送 Comet 实例
实现Comet消息推送功能,根据登陆人定向推送,解决刷新页面原有ScriptSession不能及时销毁的问题,DEMO比较简陋,请先进入login.jsp页面登陆。根据登陆名称判断推送目标,可登陆多个用户进行测试。
通过tomcat服务器,向网页发送即时消息。comet的小例子,可以直接运行,用tomcat6.0。
comet iframe phpcomet iframe phpcomet iframe phpcomet iframe phpcomet iframe phpcomet iframe php
Java comet服务器推送(聊天)实现代码。
comet4j 自己写的消息推送 觉得实用
基于推送技术的asp.net实时图形 可以自定义刷新时间
java comet服务器推送使用步骤及例子
Comet服务器推送技术
javaweb消息推送 基于comet实现局域网内部通讯(聊天室)demo 功能特性 推送消息广播。 推送定向消息。 提供连接上线前、上线、下线前、下线、发送消息等多种可处理事件。 消息缓存机制,确保长轮询工作模式下不丢失...
Comet4J是一个微型的即时推送框架,它分为服务端与客户端两部分,你只要将服务器端(JAR文件,目前仅支持Tomcat6、7)放入WEB-INF\lib,客户端(JavaScript文件)引入到页面,那么你的应用就具备了向客户端推送信息的...
comet4j,是服务端消息推送技术。直接可以运行
comet4j的技术来实现推送消息到web页面,可以直接导入,直接运行的,里面包含了项目所需要的comet4j-tomcat7.jar(tomcat7的就导入这个),comet4j.js(页面引入这个js),等jar包,对于想要学习comet推送机制的童靴是很...
demo是采用comet的web推送技术,使用tomcat7做服务器,内含tomcat7上面配置说明,在MyEclipse、tomcat7上面完美运行,本人亲测!
DWR+JAVA进行web消息推送dwr-comet.zip
实现Comet消息推送功能,根据登陆人定向推送,解决刷新页面原有ScriptSession不能及时销毁的问题,DEMO比较简陋,请先进入login.jsp页面登陆。根据登陆名称判断推送目标,可登陆多个用户进行测试。
这是一个利用comet4j第三方插件,实现javaweb项目中后台消息向前台推送的一个功能,前台只要利用jquery,后台是用java实现,tomcat用7的版本
comet4j推送Demo,tomcat7环境下
NULL 博文链接:https://packecho.iteye.com/blog/857027
服务端向浏览器实时推送消息,支持在线指定用户推送。内部带详细讲解,和举例,和代码嵌入步骤。